Saturday 29 October 2011

Glitter overload

I'd heard about the glorious density of the Barry M glitters, so decided to get a lovely blue one when I bought a tonne (suppose you could call it a haul....) a week or so ago. And it did not disappoint....it was more or less opaque in just 2 coats, but added a third to make sure there was no bare spots. I was amazed at how dense it was, and completely fell in love with it. However I did take a step back and realise it wasn't going to be so fantastic when I had uni late on in the day, so decided to tone it down a tad with some matte topcoat. Still loved it nonetheless ;)


Oh, I apologise for not cleaning up properly. I was too excited XD

Autumn tree flower things...

I love a bit of Barry M. They're affordable, and come in a tonne of colours and glitters. Although their names don't tend to be properly descriptive of the colour in the bottle, they're great nonetheless. the majority of Barry M's I own have a great formula, with only one or 2 being annoyingly too sheer.

So, my friend had text me a 20% off discount code for their website and I took full advantage to say the least. Once they arrive, I wanted to do a new nail design incorporating a few of them (I got a wide range, from citrus colours, to glitters and autumn colours so I couldn't really use them all for the one design lol).

I had seen a youtube tutorial for cheery blossom trees so decided to try my hand at the same design. however I went a bit crazy on the dotting, so they weren't quite as bare and empty as cherry blossoms usully are, but it was still a nice design in the end :)


Out of rubbish comes a gem!

I remember doing my nails quite late one night and I had a 9am start the next day. It had been a rather poopy day, and already had a headache before the nail polish/acetone fumes even reached me so I wasn't in the best of moods to do my nails. But my previous nails had been chipping, and I have a habit of peeling my nail polish once it chips...it's already destroyed, so I see no harm in making it worse :p And I've gotten to the point where I cannot stand my bare nails. And they're now pretty stained ¬_¬

So looking at my stash of gems and polish I ended up doing this...flower?...ish thing. I hadn't had a previous idea of what to do, so I was basically winging this idea. And I did not like it. I liked the base colour (Collecion 2000, Parma Violets, if I believe so) Dunno, it didn't seem interesting enough...a bit plain. Maybe I've been brainwashed by my previous designs...but I wasn't in any particular mood for a plain and simple design, ironic considering my mood :P


So i was sitting pondering what design looks rather fancy yet simple, and the infamous drips came into mind, and form there came layering and matte effect! I grabbed a light and dark colour and a white and began my design, and here's what came out of it...


Once I finished I realised there wasn't an accent nail, so I grabbed a blue and silver glitter polish and attacked my ring finger. I love a bit of matte polish, and I ended up really liking these nails :)

Peacock feathers

I'd been thinking about doing real feather nails, but I hadn't got round to buying feathers at this point (a post I'll be saving for later ;) ) so I decided to do some peacock nails. It's a pretty easy look to do, and you could probably get away without having any proper nail art brushes, it's basically some stripes with some blobs of varying colours hehe.


HOLOOOOOO!

I fell sorry for Mr Fizzy Vimto nails. I watch many nail art videos and read mayn blogs, and get super excited when I saw awesome swatches...I assume he never listens....

Until my birthday came along, and I opened the wonder that was GOSH holo! :D It's sold out in the UK so I have NO diea how much he paid for it on ebay, but it was such a lovely surprise as it was the last thing I'd expected him to get me :D

If you haven't read any reviews on the GOSH holo, then it's bascially a one night polish, made for a night out to make your nails wonderous and magical, so it chips and peels really easily. Putting a top coat on dampens the holo, so that's not recommended. However, it is pretty easy to paint over any chips or peels as the new polish blends in really easily with the old polish, and it's really hard to see the join.


It's pretty hard to get a decent shot of a holo (especially with my Blackberry camera -__- ) as you need a video of it shimmering in the sun, but this photo shows the rainbow pretty well :)

I've not tried any other holos as only the more expensive brands tend to do them (and in different colours also), but a holo seems to be something to have at least one of in your collection!

Basket Weave

I'd seen basket weave nails around on tumblr and blogger so I thought I'd give it a go. The final look ended up a big wobbly cos I used a nail art pen rather than a brush, but I think it's a nice alternative to stripes :)

My nails are a taaaad too long here, look talon-ish :/


Either, or...

One thing I like about playing about with nail polish and the like, is the fact you dont have to do each nail or hand exactly the same :)

I'm not a typically girly girl, I don't like the colour pink (I only have one, maybe 2, pink nail polishes) and I tend to have guy logic on most life problems :p

But the one pink nail polish I like in my collection is Fruit Salad by Collection 2000. It's not too girly a pink, sort of on the red, salmon-ish side of the colour scale... Yes, I am a n00b at this describing lark, I'll try and get better at it :) But I quite like the formula as well, it's opaque in 2 coats at the most and it's pretty quick drying, which we all want from a nail polish don't we? 

So yes, back to the nails, I was torn between doing girly, floral nails with 3D nail decos and glitter (or as I like to describe, "girl vomit" XD ) or go gothic-ish with some black stones.

I decided to keep both colours the same to keep them more together, and I thought the black stones would be a nice contrast against the pink base. 


I wanted to do something a little different from the usual polka dots, and I thought some black rhinestones would add a nice 3D tough. Kind of studded-ish.


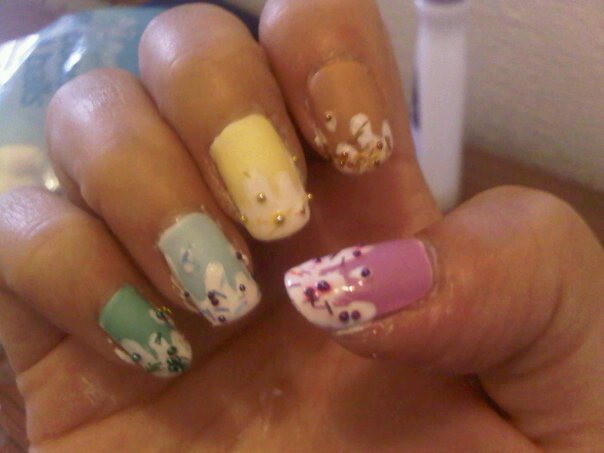
And here's my girl vomit hand :p You could say this was Japanese inspired as a lot of Japanese nail art tends to have 3D decos and rhinestones and glitter and...well, you get the idea. This was my first time using the floral decos, and I was worried about them popping off straight away (I use clear nail polish instead of nail glue for decos since it's easier to take off and I'm worried nail glue would damage my nails) But I found some glooped up quick drying top coat so I used that as a glue, and to dab around the base of the flowers, and they lasted a good few days with showers and uni to deal with!


Tuesday 25 October 2011

When polish block hits....

I apologise profusely for these nails...I hated them once I finished them :( I was in Edinbrugh at my Mr's mum and dad's so I had a limited collection of polish with me, and I also had a bit of polish block.


This did not turn out the way I wanted it to...AT ALL. I wanted to make a nice, swirly design, but the brush I used was too thick, so it's jus ended up a bit blocky and clumsy, rather than delicate and floral-esque :(


Monday 24 October 2011

Did a disco ball throw up on you?

I was perusing in the nail polish collection of my local Boots one day when I saw this lovely glitter nail polish. It had little bits of blue, silver, green, yellow...AND it was called Disco Ball! How could I not buy this!? :D

I didn't expect it to be as pigmented as some other glitter nail polishes, such as Barry M or OPI, so I knew i could only really use Disco Ball as a top coat. But I didn't want anything just that simple, so I decided to attempt a glitter gradient. Which half worked...I got impatient with the layering (this was quite late at night if I remember correctly) so I did that thing of waiting for each layer to half dry, and then just slopping on another layer...and then going to sleep...which is never a good idea, wrinkle central!


Pick 'n' Mix

I often get in moods where I can't choose what design to do, my mind just seems to randomly get filled with all these crazy ideas, but I feel like I don't have enough time (or nail polish remover) to do them all (which reminds me, I need to get a little notebook to jot down my ideas and not use my uni notebook...)

So, I decided to do each and every finger a different design. Why not? there's no rules as to say that you have to do both hands\each finger the same...some rules are meant to be broken ;)

Right Hand
Thumb: cloudy sky with birdies
Forefinger: hexagonal glitter (kiiiiind of tried to make it look like fish scaled. But failed :p Also, the purple ink ran off as soon as I put top coat on D: )
Middle finger: pastel strawberry
Ring finger: iconic smiley face
Pinky: cow print


Left Hand
Thumb: lilac with purple crackle
Forefinger: polka dots with fruit fimos (the nail polish is called Fruit Salad!)
Middle: midnight blue with blue glitter
Ring finger: rhinestone mentalness! :D
Pinky: Minnie Mouse inspired with rhinestone bow


I had quite a bit of fun with this "manicure" (i dont feel right calling it a proper manicure, as I've yet to get into the habit of doing my cuticles and such hehe). It was a bit hectic as I hadn't planned beforehand what to do, so i was to-ing and fro-ing from my bed to my nail polish box.

But I did get a lot of ooohs and aaahs from my friends :3

Friday 21 October 2011

In a galaxy far, far away...


I'd been dying to try galaxy nails for a while, and finally got round to it :) 

It's a lot more easier than it looks, and the effect is fantastic once you've done it!

It's more or less just sponging techniques, so ll you need is some sponge (I used some old make up sponge, but eye applicator sponges, washing up sponge, any sponge would do), black, white, pink, yellow and glitter nail polishes. The glitter is optional but I think glitter polishes are good for blending out sponge marks.


"You can't look at a cupcake without smiling"

I'd seen the legendary drip effect nails on various tumblrs and youtubes, so I decided to try my hand at it. I wanted to do some sort of pastel colour but not sure which one to choose, so decided to choose all of them and do some cupcake-ish ones :3 I decided to make them look a bit more cupcake-y, so decided to use some colour coordinated strand glitter and micro breads at sprinkles. I got them off ebay, so they were very cheap, sad thing was that the ink ran off the beads one i put some top coat on :( as you can  see, I added some matte topcoat onto the coloured part to give it a bit of exra dimension.


Creepy nails...

I decided to do some nice, simple nails for a job interview I had coming up, and had picked up Revlon's Gray Suede. I'm pretty much brainwashed into always doing something nail art-y whenever I do my nails and decided to put on some rhinestones to jazz it up a bit.

However, I didn't like the final results :/ Due to my rather sallow skin tone, the beige made y nails more or less blend in with my fingers, and it just looked rather strange with my long nails. And the rhinestones were rather too large :(


Itsy Bitsy Polka Dot Bikini

It's been a while since I've updated this, this post has been in my drafts whenever my last post was, but I've been kinda busy with uni and Mr Fizzy Vimto Nails and his friends decided to do a 24 hour gaming session for charidee so my blog has been kinda neglected for a little while :(

Anyways, I bought 2 reduced China Glazes when I passed by Sally's Beauty supply. I hadn't actually got round to do something simple like polka dots so I thought this would've been a good opportunity to try some. As always, I like to add an accent nail and to make the design a bit more interesting, so I used gems and the opposite colour on my ring finger :)

Looking back, I should've done the spots a bit smaller, and made a neater pattern.


Monday 10 October 2011

Metallic Faded-ness

I'd seen a tutorial on youtube on how to do tie dye/acid wash denim effect nails, and I really liked the idea of them. However, I was at my boyfriend's house at the time I needed to do my nails, and I was stuck with this metallic colour and a shimmery purple. 

I wasn't sure if the colours would've complemented each other but the final effect turned out quite well :)

What you do i apply 2 coats of a base colour, and then 2 coats of another colour on top. Once all the layer have dried, take a cotton bud dipped in nail varnish remover, and gently rub onto your nails to take off patches of your top colour. Continue rubbing until you see your desired effect :)


Sunday 9 October 2011

Matte neon half moon manicure

Must admit that I'm a bit of a stalker in my local Sally's. I mainly buy drugstore brands like Model's Own, Barry M, Collection 200 etc, so Sally's is my haven with OPI and Chine Glaze, polishes I deemd too expensive. Until one day when I'd just got paid and decided to buy some. It was buy one get one half price on OPI, and I also found some decent reduced OPIs as well. And because I'd got some OPI's, I felt obliged to get some China Glaze too :p

I'd seen people doing half moon manicures so I thought I'd dabble in a bit myself, as I liked the simple idea of contrasting 2 colours with a simple design.


I done this design by using hole reinforcers from WHS Smith and placing them at the bottom of my nail (on top of my base colour) to achieve the half moon affect, and paining another colour on top.

The 2 colours I'd used were actually already matte, so I decided to not use a topcoat to keep the effect.

Polish block

I must admit, once in a while I get polish block and I can't think of anything interesting to do...hence how this design was born. I felt like doing something with rhinestones but wasn't sure what to do :/ i was also torn between using a dark midnight blue or a purple (my favourite colour). So....I ended up with this...I decided to alternate between the colours of stones to try and make it a bit different.


P.s I apologise profusely for the complete lack of clean up...

Tonari No Totoro...

If you have never seen My Neighbour Totoro or any of the Studio Ghibli films, I strongly suggest you do! I grew up watching Totoro and Laputa: Castle in the Sky, and I thought I'd do Totoro nails :3

I drew the main monster characters on my "accent" nails, and just did a simple design with pearls, star sequins and rhinestones.


I must admit, very few people knew who or what Totoro was, but those that did appreciated my efforts :)

Purple Swirl

This was my 2nd attempt at non-water marbling, but this time I used a fan brush I got with my nail brush set. I never really understood what it was for, so I thought I'd put it to good use :P

I used the same mehod as before, used a base, and blobbed on the colours, and then swirled them together with a brush. The final effect was a bit more defined than when I did it with a dotting tool. 

I thought I'd define some of the swirls with some rhinestones, but I don't think it looked quite right in the end.


TITP

You can pretty much guess why I done these nails. They're horrifically messy, but I wasn't too fussed about whether they would've been neat or not since they would've got ruined when I was there :P


TITP was pretty awesome though, saw Beyonce (where I nearly died thanks to over eager fans) and a few other awesome folk I wouldn't have seen otherwise :P

My proudest creation!

Words cannot explain how proud I was to not only create my own design with no help from youtube, but for it to be as awesome as something like Pokemon!

I remember the Snorlax being the hardest because the green was one of the cheap ebay striper polishes and they take FOREVER to dry, and I also couldnt get his face right.


I must admit I had to google the pokeballs, I haven't watched past the original first season, so I was only aware of the original red and white pokeball.

I decided to do the pokeballs on my left hand as they're the easier design and because I'm left handed hehe.


Safe to say my boyfriend and his geeky friends enjoyed this also!

Floral

I remember not really intending to do a floral design that week, but I had bought some nail sticker from ebay and wanted to try them out. They're just normal stickers that you just put on your nails, to save you fiddly about with stamps, water decals or nail brushes. But they are a bit fiddly, dunno if it was just me, but they easily tore if you weren't careful when taking them off the backing. They last for ages, especially if you put a topcoat on, but they are a bit annoying to take off, lots of scrubbing.


All things girly...

I must admit I'm no a girly girl...I hate pink, not much of a flower fan and...well, I have guy logic most of the time :p 

But I had a pink nail polish collecting dust (bought it because it seemed like a colour you should have) and I though it'd be a good idea to mix fimo and rhinestones to create a flower. It doesn't show up too well in the photo (thanks lame-o Blackberry camera) but I added a coat of pale pink glitter as well. If I was going to go girly, might as well go the full hog :P


What's black, white and red all over?

Minnie Mouse nails! I didn't do these on myself, I did them for a friend's birthday party :)

And as always one nail has to be different, so the thumb has clear rhinestones for the dots and a black fimo bow.

These are really cute yet simple, I also did them for a friend to wear to T In The Park!

Saturday 8 October 2011

Can't remember the name of this design :(

If anyone knows, please let me know, it's been bugging me since I done it so long ago!

Looking back on it, this is pretty messy. Lines are inconsistent and not straight, some of the colours have ran over the black :/ but this took me a while to do as you can guess :P

This is also when i started doing one nail different from the others, like the thumb has glitter on it instead of plain nail varnish.


Cos OCD never hurts.

It was around the start of summer time when I did these watermelon nails. but I didn't quite like how they turned out...


So, OCD struck and I redid them. This time with a proper nail striper brush (the ones previously were sriped with the brushes that came with the nail stripers from ebay, but they're horrid: bristles fall out in one swipe, brush thickness varies with each bottle) and a dotting tool.

I watch many cooking shows, and they always say odd numbers are more aesthetically pleasing than even, so I stuck with 3 seeds per nail, and they turned out a lot better than the original :)


Under The Sea...

This is my attempt at water marbling without the water :P


What I did was pick 2 colours, and used tone of the colours as a base colour. Once that dried, I then applied various sized blobs of  both colours, then swirled them together using a small dotting tool (or a toothpick if you don't have one) to create a swirly effect. I then added a matte topcoat on top :)

The swirls aren't as defined as it would be with water marbling, but you probably could create a more defined design if you placed blobs in a particular way and experimented with swirling :)

OM NOM NOM NOM!!

I have a slight obsession with the Cookie Monster. And Sesame Street in general, but I love this wee dude the most just cos he shares my love for cookies hehe.

Wakka Wakka Wakka!

my first proper attempt at nail art :D

Took me so long to get these right, like making them the right size to fit in the maze, and  I remember finally finishing my left hand (which took longer cos I'm left handed) and realising I'd dont it the wrong way round, so it was the opposite way from the right hand -__- so I had to start them all over again! But they were worth it in the end, I'd seen many youtube videos on how to do pacman nails, but only did the pacman and monsters ont he whole nail, but not including the maze. So I decided to do mine with the maze even thoguh I knew it'd be harder :P

Sunshine on a rainy day.

I remember the day I did these to be really gloomy even though it was summer...although I do live in Glasgow so summer doesn't really exist here XD

I finally got my nail art brushes through at this point, so I was ablet o do the details like the rainbow stripes and the sun's glasses :) Still have to learn to clean up round the edges as you can see :P

One of your five a day.

Oh  my days, looking back on this fills me with the OCD twitchiness of being neat and cleaning up o_O

Anyways, these are supposed to look like strawberries ¬_¬ I only got the nail striper/pens through at this point, so I didn't have any brushes to do better detailing on the leaves and seeds.

Gotta Catch 'Em All!

So, after the first attempts, I decided to go onto ebay (my best friend, but my bank account's worst enemy) and get nail art tools and decorations. Like dotting tools, nail art brushes, cheap crappy striper/pen nail polishes (got 92 for like £20!) and things like rhinestones, fimo shapes etc.

When I decided to do these nails, I wanted to do something simple cos none of my stuff had been delivered yet, and I looked up a video on youtube, and these were do-able with a toothpick and a kirby grip...apparently...I failed on the toothpick and kirby grip technique and that's why these are so messy :P But they still turned out pretty well considering :)


Ah crap, got the song stuck in my head now :(

And here's how it all began...

These were my first attempts at nail art, can't even remember when, round about sometimes in May, because I remember doing these just to take a break from exam revision :p It's just a simple sponge gradient effect and a glitter on top to help blend the colours a bit better.

I did the blue first as I was in a "blue" mood, but then I realised I needed to change the colour to more orange/coral colour because I had my friend's engagment party and my top was that colour. Although you can't really see the colours as much in the orangeey one :( and I would've also preferred a gold glitter for those ones, but I didn't have any at the time :(


Looking back on these 5 months on, they look so messy :/ I've only just started getting into the habit of cleaning up before I take a photo, I get too excited if they turn out well) and want to take a photo sraight away.

Oh, please don't expect any good quality photos, I only have a camera phone (a BB bold) and the flassh affect the colours either making them too bright or too dark :( ONE DAY I'll invest in a proper camera...Once I get some money :P

 And after these surprisingly successful attempts, my obsession began....

Backdating...

Even though I've been doing nails designs for a good few months now, and changing them once or twice a week, I've only recently decided to blog about my (successful) designs...which means a LOT of backdating :(

So here goes... *sighs*