I had recently purchased the Models Own ASOS exclusive polish, Party Pieces which is a fantastic glitter polish so I thought I'd do a glitter gradient with Essie's Orange It's Obvious as a base. As lurid and loud as the mani was, I loved it!
Showing posts with label orange. Show all posts
Wednesday, 11 September 2013
My Birthday Nails! Feat. Essie and Models Own
It was my birthday fairly recently and although I wasn't doing much for it (I actually had another friends birthday party the same day lol), I wanted some glittery nails as a mini celebration.
Friday, 16 August 2013
Swatched! Bourjois: Meli Melon
Everyone's heard about turquoise block and blue no blues from the Bourjois 1 Seconde Gel polish collection, the uniquely bright turquoise and blue offerings that were great for the summer. However I haven't seen many posts Bout their peachy orangey offering, Meli Melon.
I purchased this when I picked up turquoise block and blue no blues as Bourjois had a 3 for 2 deal on and I do love a peachy orange. I also picked up a Barry m Gelly in Papaya (if memory serves me right!) and it wasn't till I got home tht I realised they were pretty much the exact same colour, with one of them being a smiiiidge darker. So if you have One than there's no point having the other, but I guess it's always good to have a full collection right? ;)
Meli melon isn't as bright as it's blue or turquoise counterpart, but it's a lovely peachy colour for summer if you found turquoise block and blue no blues a tad too scary to wear.
Friday, 9 August 2013
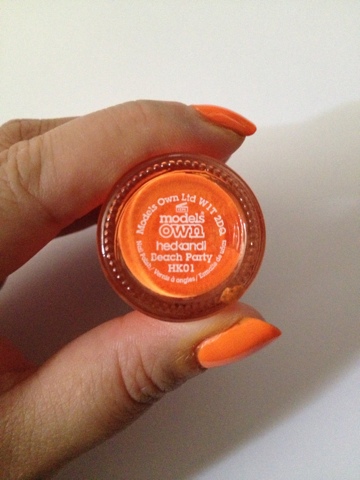
Swatched! Models Own Hed Kandi: Beach Party
I love a good orange, on my lips and on my nails. Think it's because I dislike red as a colour and i find it a bit too hard to pull off as a lip or nail colour and I personally think orange is easier to pull off and modern take on the classic red.
Beach party is a gloriously neon orange that I just can't stop staring at. This is with 4 coats as 3 was still a smidge patchy however I do have overly ridged nails and I didn't use a white base coat either so I'm sure three or even two coats would be plenty enough if I used a ridge filler and a white base coat.
Saturday, 9 March 2013
Swatched! Essie: Orange, It's Obvious
I'm using the (very basic) Blogger app for iPhone to post this so hopefully this post ends up okay. It'd be really helpful to have a decent iPhone app for blogger/blogspot!
Anyways, I've got an Essie polish today, in Orange, It's Obvious. As you may or may not know, I don't generally like a bright red polish, or bright red in general to be honest, but I am partial to a bright orange!
This goes for nails and lips as well. Not sure why, but orange doesn't seem as in your face than red to me, which is ironic since you'd expect orange to be the more offensive one lol.
Orange, It's Obvious is opaque in 2 coats but I used 3 as I could still see a wee bit if my nail line. I then used a coat of Seche Vite. It's quite a dark orange and leans towards the red side of things rather than yellow, which could be nice for those use to red but not orange. This one has Essie's new, wider brush which I'm still iffy about as its good for my larger nails but not so much for my ring an pinky nail, which require quite a bit of clean up afterwards.
The blogger app only lets you's post photos after text, an you can't integrate the 2 which I'm not sure if I like :(
Anyways, I've got an Essie polish today, in Orange, It's Obvious. As you may or may not know, I don't generally like a bright red polish, or bright red in general to be honest, but I am partial to a bright orange!
This goes for nails and lips as well. Not sure why, but orange doesn't seem as in your face than red to me, which is ironic since you'd expect orange to be the more offensive one lol.
Orange, It's Obvious is opaque in 2 coats but I used 3 as I could still see a wee bit if my nail line. I then used a coat of Seche Vite. It's quite a dark orange and leans towards the red side of things rather than yellow, which could be nice for those use to red but not orange. This one has Essie's new, wider brush which I'm still iffy about as its good for my larger nails but not so much for my ring an pinky nail, which require quite a bit of clean up afterwards.
The blogger app only lets you's post photos after text, an you can't integrate the 2 which I'm not sure if I like :(
Sunday, 22 July 2012
Marmalade Doodles
I've been meaning to do a doodle-esque mani for a while, but I've been lacking in appropriate imagination and patience recently.
I used Revlon Colourstay in Marmalade for the base, and I have to say that the Colourstay range takes SO long to thoroughly dry, I have a few from this range and they all take so painstakingly long to dry. I left this mani to dry for 3 hours and still managed to dent it when I went for a nap...however a nice layer of top coat helped smooth things over :)
| ORANGE: Revlon Colourstay - Marmalade WHITE: Ebay - Unbranded |
I'd also like to add that my thoughts, hopes and wishes go out to those affected by the Colarado shootings. Hopefully this is the final straw to make the state to change it's gun laws.
Monday, 14 May 2012
If Nothing Ever Changed There'd Be No Butterflies....
As you can tell from the new post, I am free from all things examinable and uni related! (at least until resits start...which I hopefully don't have to do...argh...) WARNING: This post becomes rather rambly after the photo, so you can stop reading afterwards if you wish XD
Moving on, I realised it'd been around 2 months since I'd done a design...was quite disheartening...darn exams! I'm not sure why I decided to do butterfly wings, I thought they looked lovely on a tumblr photo I'd seen, (the person used metalic polishes though, so they looked more...sheeny?...Is that even a word?...Obviously vocabulary is my strong point ¬_¬ ), so I thought I'd give it a wee bash. I don't have many metallic polishes since I'm not a huge fan of pearly/metallicy finishes, so I just used creme finishes instead.
To create the base, I used Rimmel Lasting Finish 280 Sunshine but it was so streaky and patchy even with 3 coats, that I ended up sponging over it with a yellow polish anyways. The red/orange gradient was done by sponging too, generally coming in from the corner of the nail rather than just the bottom as I was attempting to make the wings almost diagonal looking? However, my lack of practising drawing the black outlines led to the majority of the nails looking...well, shit XD
But I managed to get the hang of the method for a few of the nails (middle and pinky) so I definitely know what to do for next time. I then just added a few white dots on the tip of the nail, smeared on a fast dry topcoat (it's become rather gloopy!) and ta-daaaaaaah...monarch butterfly wings!...ish... ¬_¬
So, a few posts ago I said something about selling some false nail sets online (either folksy or etsy) to make a bit of money over summer and to give me something to do. I'm still planning to do that, so hopefully should start things rolling around next month once I get supplies in like false nails, glue, etc. Not sure of which designs to do though, as the seller I found on ebay for false nail sets only does them in batches of 5, and I dont want to buy too many in case this just epicly falls flat on it's arse and I'm left with tonnes of nails just hanging about not bought by anyone... Although after calculating how much everything would be, it shouldn't cost too much for eveything so it wouldn't be too much of a loss if this fails :)
Moving on, I realised it'd been around 2 months since I'd done a design...was quite disheartening...darn exams! I'm not sure why I decided to do butterfly wings, I thought they looked lovely on a tumblr photo I'd seen, (the person used metalic polishes though, so they looked more...sheeny?...Is that even a word?...Obviously vocabulary is my strong point ¬_¬ ), so I thought I'd give it a wee bash. I don't have many metallic polishes since I'm not a huge fan of pearly/metallicy finishes, so I just used creme finishes instead.
To create the base, I used Rimmel Lasting Finish 280 Sunshine but it was so streaky and patchy even with 3 coats, that I ended up sponging over it with a yellow polish anyways. The red/orange gradient was done by sponging too, generally coming in from the corner of the nail rather than just the bottom as I was attempting to make the wings almost diagonal looking? However, my lack of practising drawing the black outlines led to the majority of the nails looking...well, shit XD
But I managed to get the hang of the method for a few of the nails (middle and pinky) so I definitely know what to do for next time. I then just added a few white dots on the tip of the nail, smeared on a fast dry topcoat (it's become rather gloopy!) and ta-daaaaaaah...monarch butterfly wings!...ish... ¬_¬
| All colours from ebay! |
So, a few posts ago I said something about selling some false nail sets online (either folksy or etsy) to make a bit of money over summer and to give me something to do. I'm still planning to do that, so hopefully should start things rolling around next month once I get supplies in like false nails, glue, etc. Not sure of which designs to do though, as the seller I found on ebay for false nail sets only does them in batches of 5, and I dont want to buy too many in case this just epicly falls flat on it's arse and I'm left with tonnes of nails just hanging about not bought by anyone... Although after calculating how much everything would be, it shouldn't cost too much for eveything so it wouldn't be too much of a loss if this fails :)
Sounds quite scary that I'm opening a kind-of-but-not-really shop :/ It's been more or less a year since I started messing about with polish designs (the polish obsession has been ingrained for a good few years obviously) and now I''m considering selling some designs...I wasn't even expecting to create a blog, and when I did, I didn't expect to even gain one follower never mind 12...12 followers is nothing compared to the more "famous" polish bloggers, but it's a lot to me and I appreciate that people have spent time reading my mindless rambles haha!
Anyways, I shall keep you posted once my "shop" starts if you'd like to purchase my questionable designs or you can buy them as a gift for someone :)
Farewell and have a nice day! Till next time!
Anyways, I shall keep you posted once my "shop" starts if you'd like to purchase my questionable designs or you can buy them as a gift for someone :)
Farewell and have a nice day! Till next time!
Tuesday, 21 February 2012
Bits and Bobs
Sorry for not many updates recently, been a bit bogged down with uni deadlines and general life decisions... Been pondering if I actually enjoy being at uni and only decided to go back because I felt I had to and not because I wanted to...meh.
Anyhoos, this is a bit of a spammy post, just some photos of some designs that I did offhand, testing out some methods/new polishes that I felt didn't warrant a whole post on their own...
| China Glaze: Electric Pineapple, Papaya Punch Mattified with GOSH matt effect. |
| Swirly accent nail |
![]() |
| China Glaze: First Mate Barry M: Gold Foil |
On another note, I've (semi) decided to start selling false nail sets with premade designs to raise a bit of cash and to sort of have a job :p It's gonna take a while because I need the time and money to start it up, but going to start with just 20 at first in case it doesn't kick off as well as I'm hoping :p It's a bit scary venturing off on my own business venture, like, in case I get in trouble with the law or something hehe. But hopefully things go okay and I dont get put in jail or something XD
Saturday, 8 October 2011
And here's how it all began...
These were my first attempts at nail art, can't even remember when, round about sometimes in May, because I remember doing these just to take a break from exam revision :p It's just a simple sponge gradient effect and a glitter on top to help blend the colours a bit better.
I did the blue first as I was in a "blue" mood, but then I realised I needed to change the colour to more orange/coral colour because I had my friend's engagment party and my top was that colour. Although you can't really see the colours as much in the orangeey one :( and I would've also preferred a gold glitter for those ones, but I didn't have any at the time :(
Looking back on these 5 months on, they look so messy :/ I've only just started getting into the habit of cleaning up before I take a photo, I get too excited if they turn out well) and want to take a photo sraight away.
Oh, please don't expect any good quality photos, I only have a camera phone (a BB bold) and the flassh affect the colours either making them too bright or too dark :( ONE DAY I'll invest in a proper camera...Once I get some money :P
And after these surprisingly successful attempts, my obsession began....
Subscribe to:
Posts (Atom)